Summary:
It is oftentimes desireable to "split" a ShoWorks data file into smaller files when one or more of the following conditions exists:
- Your single ShoWorks data file is large (>20MB)
- You have several concurrent users working on the same file at the same time.
- The data file physically resides on a computer that is more than a thousand feet away from any one computer that has it opened with ShoWorks.
- The number of "hops" (network connection nodes) between the data file and the computer opening it, exceeds one switch.
- You wish to control the accessibility of certain data across certain users, preventing different users from inadvertently modifying data that they should not be accessing (example, prevent a user in the Swine department from accidently changing data in the Arts & Crafts department and vice versa).
In this case, one can "horizontally partition" (split) the data file so that each department, event, or location will work with their own smaller file. These files can later be merged back into the master file for futher management once the need for multi-user access has ceased.
These events or locations will more likely be bound to Departments or Divisions in ShoWorks. Therefore, you would split your file so that each file contains only the Divisions that they will be working with.
Steps to splitting the data file into separate smaller data files, one for each department, event, or location:
Before you begin, please make sure to read through all steps below thouroughly with particular attention to the section "Warnings".
1) Make multiple copies of the "master" (original) file, in our example, copy A, B and C. Do this either using Windows Explorer and copying and pasting the data file into easy to understand names - for example, representing a department, or using ShoWorks and selecting File>Save Copy of Data File As...
2) Open Copy A (our example name of one of the copied files) by selecting File>Open Data File.
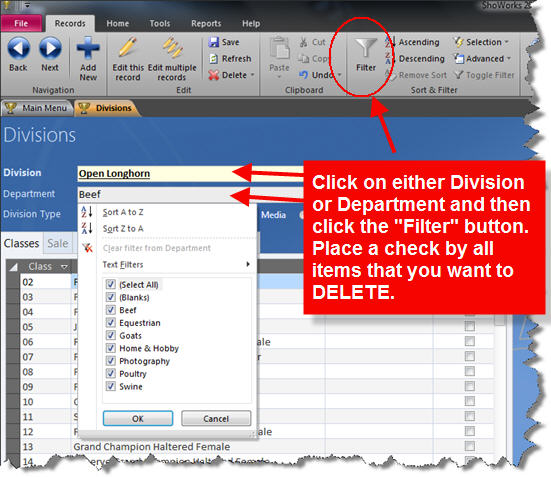
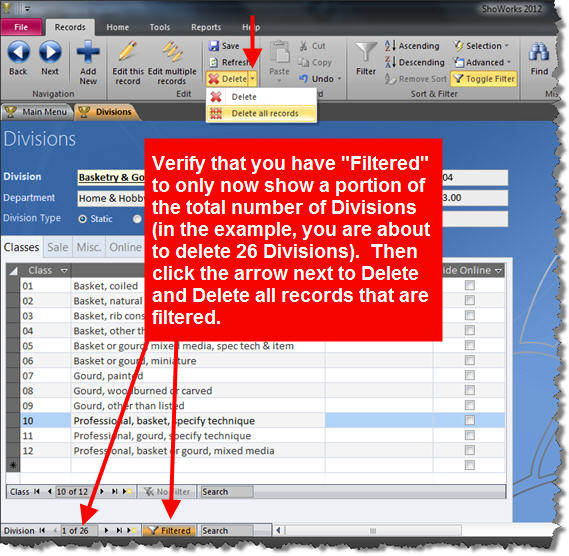
3) Delete all divisions that are not relevant to this event/location from the Divisions menu. Deleting a division will cascade delete all entries that belong to that division. Therefore, doing this will trim the file down to only those relevant records. You will receive a warning when attempting to delete a division that it will delete all entries in that division. This is expected and required. To easily delete many divisions at once, you can filter the menu to only show the divisions that you want to delete (i.e. filter to only show the divisions that you do not want). To filter the menu by either division or department, place your cursor in either field click the "Filter" (funnel) button at the top of the ribbon menu bar.

Once you have filtered the menu, click the little arrow to the right of the Delete button at the top of the ribbon menu bar "Delete all records" and confirm the deletion.

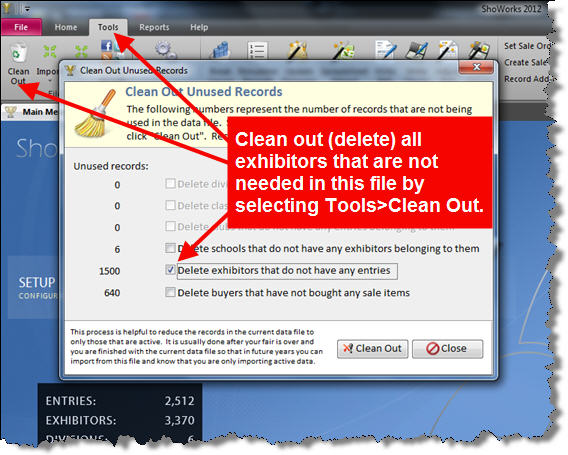
4) After you have deleted the divisions, you will notice that the total number of entries is now reduced as well. All exhibitors still remain in the data file so we should also delete the remaining exhibitors in this file that do not have any entries in it by going to Tools>Clean Out, and checking ONLY the box "Delete exhibitors that do not have any entries". Confirm the deletion.

5) Compact the data file by going to File>Utilities>Compact Data File.
6) Repeat the process for copy B, C, etc.
7) Once you are finished, you should check your work by comparing the total number of "entries" added up among each copy, with that of the master file to make sure that you have successfully split the files. Once you confirm this, you will only work in the original master file if you need to record the purchase of fee items or record payments from exhibitors until you later merge the smaller files back into this file. Once all files have been merged, you can then process premiums and continue as normal.

Warnings when working with the copies:
-
Financials (such as exhibitor payments and fees they purchased), are not merged and therefore any exhibitor payments or premium checks should be created and managed from the "master" (original) file.
-
Entries from the smaller files will be merged by ShoWorks matching their Entry Number and checking it against the date the record was last modified. Therefore, make sure that users do not change the Entry Number. If the user needs to "add" a new entry, make certain that any new entries added are assigned a unique Entry Number that will not be used by others who may also do the same in other files. To make this easy and simple, the workers on each data file should agree on a range of new numbers they will use, such as "Copy A will assign any new entries, an Entry Number beginning with 40001, and Copy B will begin with a range at Entry Number 50001, etc.". Once one "seeds" a data file with a new Entry Number, subsequent entries added will automatically be assigned the highest existing Entry Number, plus 1 (i.e. if you added an entry and gave it an Entry Number of 40001, the next entry you add will automatically be given an Entry Number of 40002, etc.)
Steps to merging the smaller data files back into a single file:
1) To later merge the files back, open the original master file and make a copy of it for safe keeping.
2) Open the Entries menu and delete all entries (using again, the little arrow next to the delete button to "Delete all records") in the master file.
3) Compact the master file by going to File>Utilities>Compact Data File.
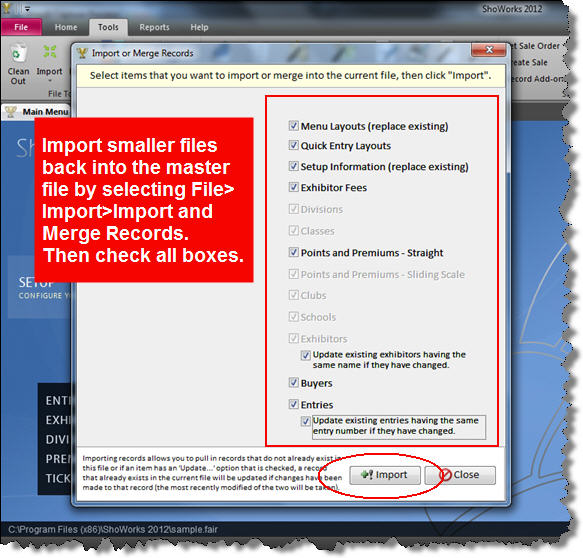
4) Import all changes from the smaller files by going to File>Import>Import and Merge Records.

5) Place a check in all boxes, click "Import" and select Copy A.
6) Repeat for Copy B, C, etc.
You may now process premiums, write checks, and continue as one whole file.